How a One-Compartment Septic Tank Works and How to Build One: A Step-by-Step Guide
In this post, you are going to learn how to build a one-compartment septic tank with its soak pit from start to finish.
PUBLIC HEALTH ENGINEERING

How a One-Compartment Septic Tank Works and How to Build One: A Step-by-Step Guide
Table of Contents
What is a Septic Tank?
What is the Difference Between Sewage and Wastewater?
How Do Septic Tanks Work?
Materials Needed for Building a Septic Tank
Step-by-Step Guide to Building a Septic Tank:
Step 1: Setting Out and Excavation
Step 2: Cast Concrete Bed
Step 3: Build the Walls
Step 4: Plumbing Installation
Step 5: Connect the Rest of the Plumbing System to the Septic Tank
Step 6: Fill the Soak Pit with Hardcore
How to Maintain a Septic Tank
7.Frequently Asked Questions
Core concept or idea
In this article, you are going to learn how to build a one-compartment septic tank from start to finish.
As a civil engineer with years of experience in building and construction, I clearly show you how you can build a one-compartment septic tank by yourself. This article simplifies the process with a clear step-by-step guide that can clearly be understood by everyone on the face of this planet.
Types of septic tanks
There are 3 common kinds of septic tanks.
A one-compartment septic tank
A two-compartment septic tank
A plastic septic tank.

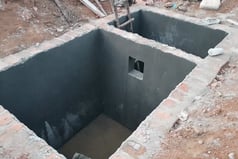

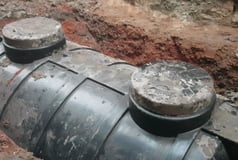

They all serve the same purpose and function. The major difference is how they are built, and in this article I’m going to share with you all you need to know about a single compartment or a one-chamber septic tank.
What is a Septic Tank?
A septic tank is a component of a plumbing system used to separate and partially treat sewage and waste water, and in this particular article we are going to look at a single chamber septic tank.
What is the difference between sewage and waste water?
Sewage specifically contains human waste that is faeces and urine, whereas waste water specifically contains all kinds of used or contaminated water from households. I’m going to show you how we do plumbing correctly for both sewage and waste water to ensure the longevity of the septic tank.
How do septic tanks work?
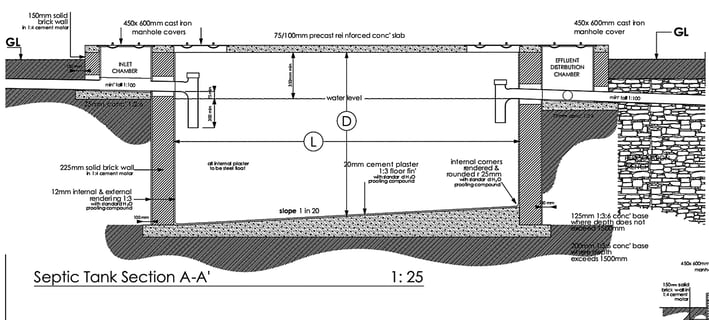

A septic tank works as a simple, self-contained system designed to separate solid sewage and liquid sewage to enable partial treatment before the liquid sewage flows to the soak pit. Here’s a breakdown of how it functions.
Separating solid waste from liquid sewage is how a septic tank operates. Sewage that is solid settles at the bottom of the tank, while liquid sewage drains into a leach field or soak pit where the earth further treats it. It is essential for everyone wishing to construct a septic tank to comprehend this procedure.
Inlet pipe: Sewage from the building enters the septic tank through the inlet pipe.
Settling and separation: once the sewage flows into the septic tank, it separates into three layers.
i). solid sewage or sludge that settles at the bottom
ii). liquid sewage, which remains in the middle
iii). Scum, which floats on top. This top layer includes grease, oils, fats, and other lighter materials.
Bacterial breakdown: inside the septic tank, bacteria break down the solid sewage into liquid sewage.
Outlet pipe: liquid sewage then flows through the outlet pipe to the soakpit. It is positioned or fixed below the scum layer and above the solid sewage layer to ensure that only liquid sewage flows to the soakpit or leach field.
When doing plumbing, waste water from the washing machine, sink, water from cleaning the house, bathtub, washing machine, and bathroom is piped directly to the soak pit without going through the one compartment. It goes directly to the soak pit, where it is filtered through soil, back to the groundwater system.
Do not allow items like baby wipes, feminine products or pads, oils, and grease to enter the septic tank system, as they can disrupt the bacterial process of breaking down solid sewage into liquid sewage and also lead to system blockages.
Materials Needed for Building a Septic Tank
The construction process for a one-compartment septic tank is similar to that of a two-compartment septic tank. The main difference is that a two-compartment septic tank includes a separating wall within the pit, whereas a one-compartment septic tank is a single pit without such a wall.
Before starting the construction, ensure you have gathered the following materials:
BRC (welded mesh)
Bricks or Blocks
PVC pipes and plumbing fittings
Sand and Cement
Aggregates
Timber for Shuttering
Steel Iron Bars
Hardcore for the Soak Pit
Waterproofing powder or liquid
With your materials ready, here’s how to build a durable, effective one-compartment septic tank.
Step 1: Setting Out and Excavation
The first step is to do site clearance, remove top black soil not exceeding 300 mm, and dispose away from the site.
Set out and excavate the area where the septic tank and soak pit will be placed. Before excavating, understand the necessary dimensions:
i) The size of the septic tank
ii) The size of the soak pit
The minimum distance from different elements such as the main building
Dimensions vary based on the number of users.
The table below shows the minimum septic tank recommended size depending on the number of users
The table below shows the minimum soak pit size recommended depending on the number of users
The table below minimum distance the septic tank from different members
I also recommend excavating a soak pit far bigger than the number of users since the whole septic tank system is completely dependent on the soak pit. If the soak pit is unable to soak away the liquid sewage, the septic tank will fill so fast and will sooner be unable to hold any waste and will eventually overflow. That’s why it is recommended to excavate a very big soak pit. For example, if you have 50 users, excavate a soak pit intended for 70 users or more.
Step 2: Cast Concrete Bed
After excavation, the next step is to cast a concrete bed at the bottom of the pit. Use a concrete mix of grade 15 with a ratio of 1:3:6 (one part cement, three parts sand, and six parts aggregates). The depth of the concrete bed should be 125 mm. 1:3:6 concrete base where the depth of the pit does not exceed 1.5 m
And then 200mm 1:3:6 concrete base where depth exceeds 1.5m
The bottom of the pit for a one-compartment septic tank should have a 1:20 slope. The concrete at the bottom should be mixed with a water-proofing powder at the time of casing concrete.
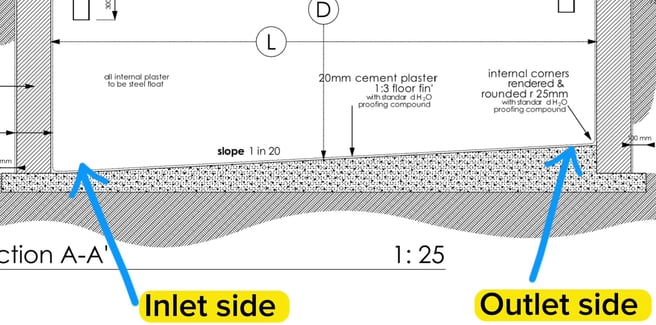

A 1:20 slope means that for every 20 units you go forward, the ground rises or falls by 1 unit. For example, let's use mm. A 1:20 slope will mean that for every 20mm you go forward, the ground goes up or down by 20mm.
The difference between a one-compartment septic tank and a two-compartment septic tank is that the bottom of a one-compartment septic tank MUST have that 1:20 slope such that all the solid sewage can settle at the bottom of the inlet side so that the liquid sewage can flow out easily on the higher end via the outlet pipe to the soak pit.
Then, on the other hand, in a two-compartment or two-chamber septic tank, the bottom can be flat or on level since the solid sewage will remain in the first chamber, then liquid sewage will go to the second chamber and then later to the soak pit.
Step 3: Build the Walls
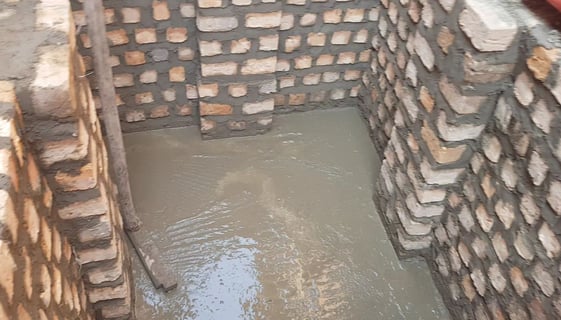

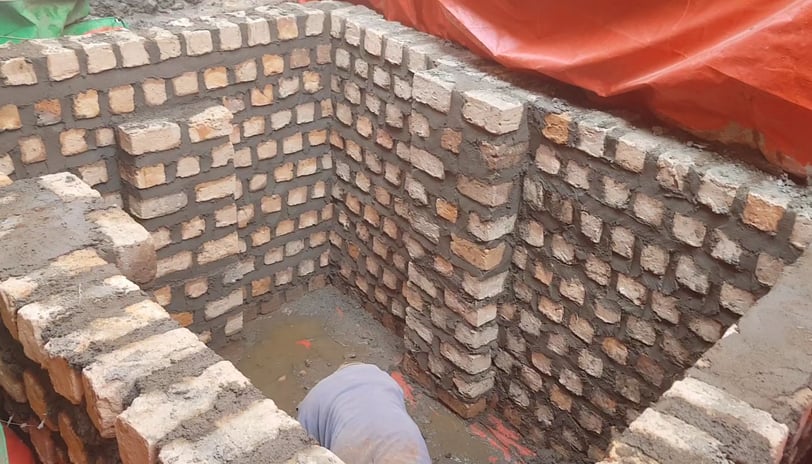
Once the concrete bed has been cast, it’s time to build the walls of the septic tank. You can use solid concrete blocks or clay bricks in 1/4 cement mortar with a wall thickness of at least 200 millimetres. Since it’s a one-compartment septic tank, it has one chamber.
Make sure that these walls have 4 pillars on the 4 sides of the septic tank. Failure to do so, the walls will fall inside after the whole work is done. That’s obvious.
For large septic tanks and also with a higher depth, be sure to include an intermediate ring beam and columns at the 4 corners of the pit if the pit is going up to 3 m (around 10 ft) deep. Failure to do so, the pit will fall inside after some time; that’s pretty much obvious.
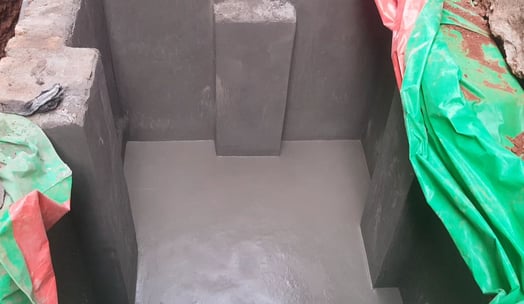

After building the walls, the next step is to render them and also plaster the bottom of the pit. Plastering and rendering mean a similar thing, i.e., casting cement sand screed in the walls; plastering is for the internal side, while rendering is for the external side.
The standard way to do both internal and external rendering, not only internal. Do 12mm rendering on both sides of the wall 1:3 with a standard waterproofing powder or liquid in the mix.
The plaster at the bottom has to be 20 mm, also with a standard waterproofing compound. All the corners in the pit have to be rounded.
Step 4: Plumbing Installation
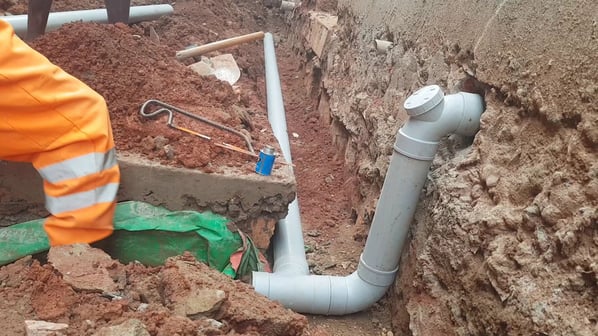

Plumbing is the most important and crucial part for the septic tank to be effective. The longevity of the septic tank is entirely dependent on the plumbing connection used.
And plumbing for a septic tank the correct way is so simple. You have to simply follow this concept.
All sewage, i.e., faeces and urine, has to be directed towards the septic tank.
All waste water, i.e., water from the sink, bathroom, bath tab, all water with fats and soap, or any other water from the house, should be directed towards the soak pit without passing through the septic tank chamber. As simple as that
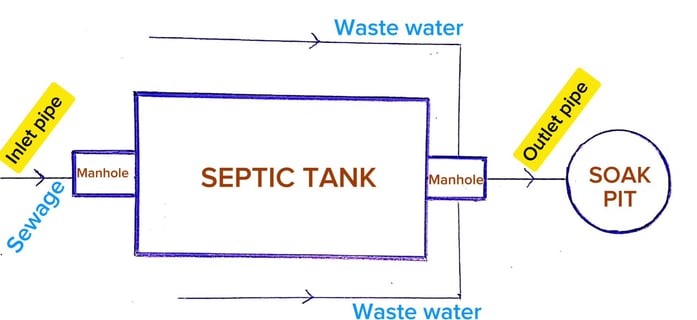

This is simply because soap and fats will disrupt the process of bacteria breaking down solid sewage into liquid sewage that can easily soak away into the ground.
When you plumb it this way, the septic tank can last even more than 30 years without ever needing to pump because it can never get full. Then, when you direct waste water into the septic tank chambers, you will need to pump every 2–5 years, depending on the usage.
The plumbing installation is crucial for the system’s functionality. Fit the inlet and outlet pipes, ensuring that the inlet pipe is positioned higher than the outlet pipe. This design allows for easier flow of liquid sewage from the septic tank chamber to the soak pit.
When plumbing, you have to position 2 manholes, one on the inlet side of the septic tank and another on the outlet side of the septic tank.
When plumbing, also be sure to include 1 or 2 aeration pipes to be able to allow aeration of the system and reduce the pressure inside the septic tank.
Ensure that the sewage pipes are on a slightly lower level than the waste water pipes, as shown in the picture below.
Include a gully trap on waste water pipes connecting to the house. Then, on the other hand, also include the p traps or s traps, any of the two on the sewage pipes. These traps help to contain bad odours or smells from entering the house. Personally, I normally use S traps as shown in the image below.
Step 5: Shuttering and steel reinforcement for the Top Slab
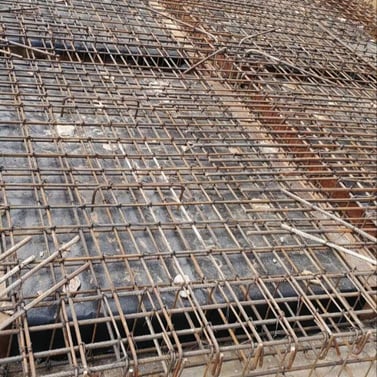

Shuttering is necessary to prepare for the concrete top slab; it must be a solid slab. Use timber for shuttering and steel bars for reinforcement. The steel bars should be spaced at most 200 millimetres apart.
Cast concrete for the top slab
Consider casting concrete of grade 20 or 25, using a mix ratio of 1:2:4 (one part cement, two parts sand, and four parts aggregates). Once the concrete has dried, plaster the exterior of the septic tank and install the manholes.
Include space for 2 manhole covers on top of the slab, one on the inlet side and another on the outlet side.
Step 5: Connect the rest of the plumbing system to the septic tank.
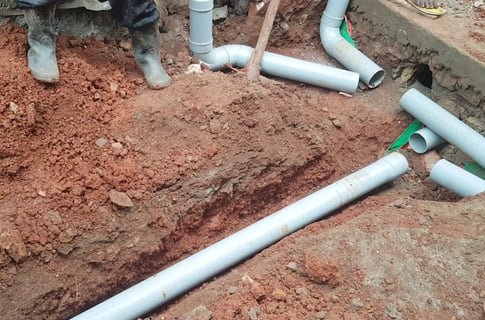

First, build two external manholes connected to the septic tank walls, one on the inlet side and another on the outlet side.
Then build other manholes linking the main house to the septic tank.
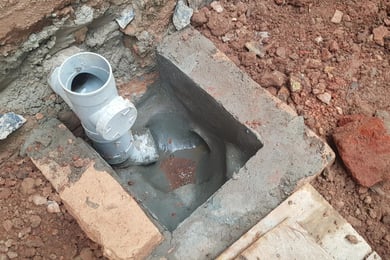

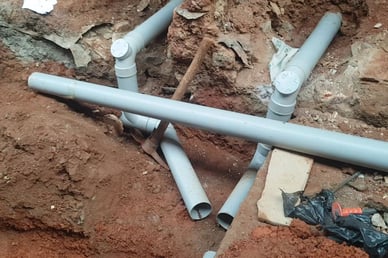

When plumbing The way you decide the position of a manhole is also simple; you have to position them at points or intervals in a way that, in case of any blockage, you are able to use a loading stick to unclog the system. That is, being a loading stick push inside the pipe to allow the easy flow of the sewage.
Step 6: Fill the Soak Pit with hardcore
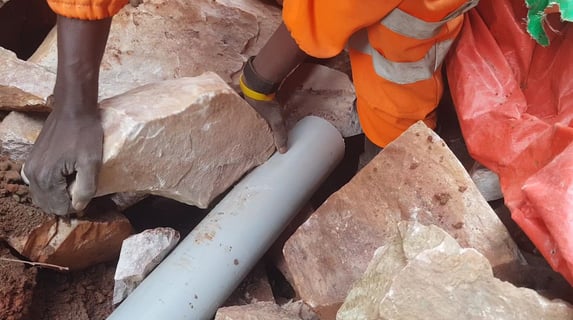

The final step is to fill the soak pit with hardcore material. This step is essential for ensuring proper drainage and functionality of the soak pit.
How to maintain a septic tank
Building a septic tank is just the beginning. Regular maintenance is key to ensuring its longevity and effectiveness. Here are some tips for maintaining your septic system:
Regular Inspections: Have your septic system inspected regularly to identify any potential issues early.
Land scaping: Do proper land scaping in a way that prevents running storm water from flowing towards the septic tank to avoid any damage.
Avoid parking large cars on top of the septic tank.
Pumping: Schedule pumping of the septic tank every 3-5 years where necessary, depending on usage.
Watch What You Flush: Avoid flushing non-biodegradable items that can clog the system.
Building a septic tank might seem like a challenging task, but once you follow the above steps, it will be pretty much easier.
Frequently Asked Questions
What are the advantages of a one-compartment septic tank over a two-compartment septic tank?
A one-compartment septic tank is simpler to build, not complicated at all, and cheaper to build compared to a two-compartment septic tank.
A one-compartment septic tank is an ideal option when in compacted small spaces compared to a two-compartment septic tank, which may require a larger space.
What are the common mistakes made when building a one-compartment septic tank?
Building a same-level bottom. When building a one-compartment septic tank, the bottom should be sloped such that the solid sewage or any heavy-weight sewage that falls into a septic tank can settle at the bottom at the inlet side to enable easy separation between solid sewage and liquid sewage, hence easy flow of liquid sewage to the soak pit via the outlet pipe.
The second common mistake is forgetting to put pillars or supports in the walls. This makes the wall so weak that the wall will eventually fall inside after a few months.
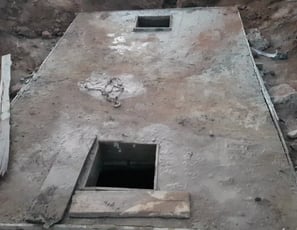

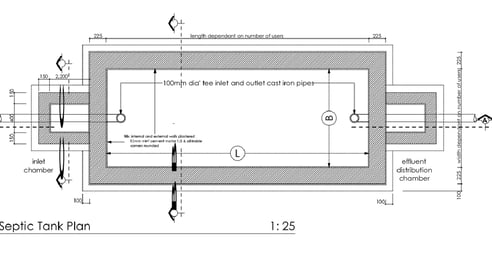

The purpose of the openings is to be able to easily repair the septic tank in case of any blockage. When there is a blockage somewhere on the inlet side, we use a loading stick and push to unclog the system; similarly, if the problem is on the outlet side, we use a stick to unclog any blockage. By putting one opening, you will be making future repairs difficult.
Another common mistake is directing waste water towards the septic tank. All waste water, such as water from bathrooms, kitchens, bathtubs, or any water with fats and soap, should be piped directly to the soakpit without going through the septic tank, whereas sewage from the toilet and urine from the urinals are the ones supposed to go to the septic tank.


Combining them will cause the septic tank to fill so fast or even cause blockages in the system.
What is the difference between a one-compartment septic tank and a two-compartment septic tank?
A two-compartment septic tank has two chambers or a separating wall in the middle, whereas a one-compartment septic tank has a single chamber with no wall in the middle.